
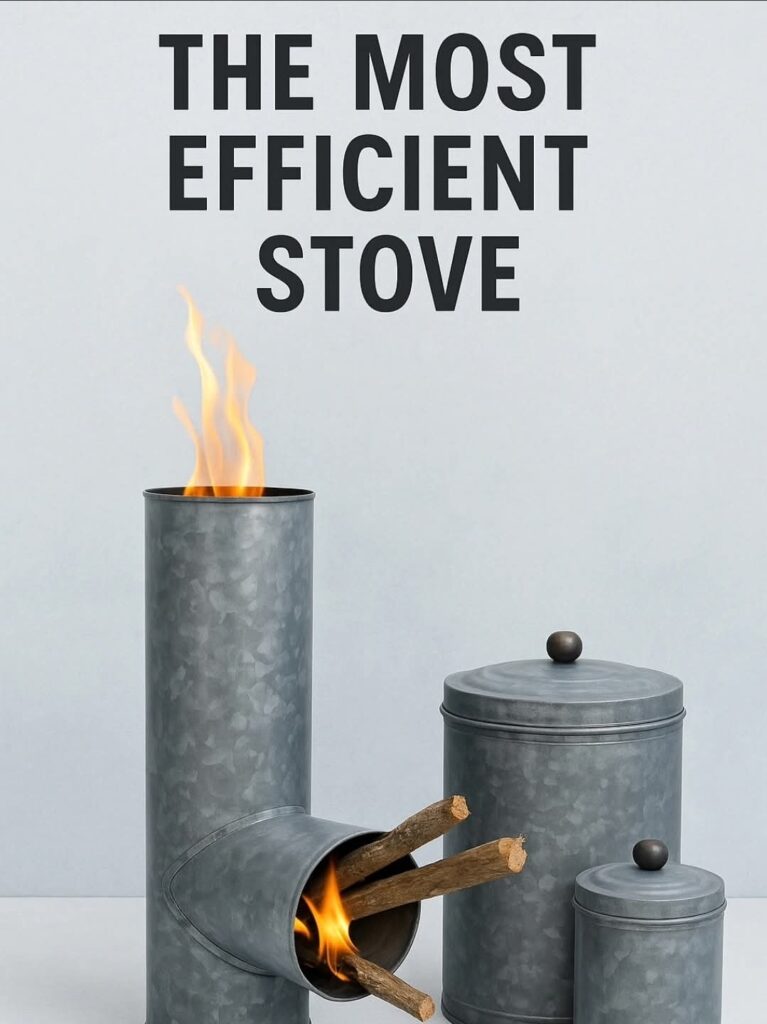
🔥 Family Rocket Stove with Galvanized Cans
Efficient, economical and safe construction for sustainable cooking
🎯Why this version
Main Advantages:
- Real efficiency: well-insulated vertical riser, complete combustion, concentrated flame
- Low cost: uses galvanized cans as external casing and homemade refractory mix
- Modular: allows future expansions
🛡️Critical Safety Note
Galvanized is only external casing; it must not be in contact with flame or hot gases. The inside is lined with refractory (5–7 cm) and the cooking surface must be cast iron or stainless steel.
⚠️ Avoid heating galvanized surfaces (risk of zinc fumes).
🚫 Completely remove PVC used as mold: never leave PVC exposed to heat.
🛒Required Materials
📦Set of 3 Cans
- Large can 11″ (vertical): base chamber casing and riser foot
- Medium can 9″ (vertical, on top of large): extends the internal chimney
- Small can 7″ (horizontal, 90°): ashtray/air port
The galvanized prevents rust and serves as protective casing.
🔧Additional Components
- Wood inlet: 45° mouth entering the large can
- Cooking surface: cast iron or stainless steel plate
- Grate: stainless steel rods (6–8 mm)
🧱Refractory Mix
Optimized shopping list:
🔨Molds and Reinforcements
- PVC pipes 4″ → mold internal ducts
- Painters tape or duct tape → join PVC sections
- Stainless steel rods → grate to support wood
🛠️Step-by-Step Construction
1Prepare the Cans
- Remove lids from large and medium
- Keep bottom of large can (will be the floor)
- Remove bottom of medium can (hollow cylinder)
- Align medium on top of large and seal perimeter
– – – ⚠️Edges can be sharp: deburr or bend with pliers
2Work on the Large Can
- Wood inlet (45°): oval hole on lower side wall
- Ashtray/air (90°): circular hole on opposite side
3Place Molds (PVC 4″)
- Vertical PVC centered (total height = large + medium)
- 45° PVC until intercepting horizontal tunnel
- Ashtray/air PVC crossing both cans
- Join all sections with tape
4Mix and Pour Refractory
Mix ratios (use 1 qt container as measure):
| Component | Ratio | Function |
|---|---|---|
| Refractory cement | 1 part | Main binder |
| Silica sand | 2 parts | Structure and strength |
| Vermiculite/perlite | 1.5 parts | Thermal insulation |
| Grog | 1 part | Reduces shrinkage |
| Kaolin clay | ½ part | Plasticity and bonding |
| Wood ash | 10% of total | Natural flux |
Process:
- Mix all components dry
- Add water until “firm bread dough” texture
- Fill space between molds and walls (5–7 cm thick)
- Vibrate by gently tapping to release bubbles
- Embed grate in 45° mouth
5Curing and Demolding
- Cure: 24–48 h in the shade
- Demold: remove tape and take out PVC in sections
- Final cure: 7 days with plastic, lightly humidify
6Progressive Firing
Internal drying schedule:
👉 This process removes moisture without cracking the refractory.
🍲Use and Maintenance
Basic operation:
- 🔥Feed wood through 45° inlet, supported on the grate
- 🧹Clean ashtray every 2–3 uses
- 🍳Place metal grill on riser for pots
🔧Possible Modular Expansions
🍳Direct Plate
Cooking surface directly on the riser
🏠Oven
Heat chamber above riser for baking
🔥Space Heater
Channel heat to brick thermal bench
✅ Conclusion
If you build this version, share photos and boiling times (1 L of water) to improve the guide and help other families.
This piece is part of our Material Support routes and resilient cooking for daily life.
🚀 Start your Project 📸 Share Results📋Appendices
Appendix A — Mix Variants
If some component is missing:
- No kaolin: increase grog to 1.5 parts
- No vermiculite: use perlite (same ratio)
- No refractory cement: mix fat clay + sand (3:2), rammed; lower strength but repairable
Appendix B — Safety and Responsible Use
- 🌬️Always use outdoors or very ventilated area; carbon monoxide kills silently
- 👶Keep children away and have extinguisher/bucket of sand handy
- 🍳Do not cook on galvanized surfaces; use safe plate/grill
- 🌲Wood: dry, without paints or glues
🛒 Recommended Materials
Everything you need to build your rocket stove


📚 Sources
- Winiarski, Larry. Design Principles for Wood-Burning Cookstoves. Aprovecho Research Center, 2009.
- Still, Dean; MacCarty, Nordica. Capturing Heat II: The Improved Cookstove. Aprovecho Research Center, 2008.
- Evans, Ianto; Jackson, Leslie. Rocket Mass Heaters: Superefficient Woodstoves You Can Build (3rd ed.). Cob Cottage Company, 2014.
- World Health Organization. Guidelines for Indoor Air Quality: Household Fuel Combustion. WHO, 2014.
- Jetter, James J., et al. Pollutant Emissions and Fuel Efficiency of Biomass Cookstoves. Environmental Science & Technology 46(19), 2012.
Support this project without spending more
Your usual purchase can make the difference
Enter Amazon through any of our links
Secure affiliate links.
If you do not want the recommended product, simply search for what you really need
Choose any product and shop as usual.
That’s it! It’s that simple.
With your purchase, Amazon sends a small commission to PrepperFamily.org for qualifying purchases.
Esta información esta genial, muy útil. Gracias! Saludos 🤗
Gracias por toda esta información tan buena. Exc página.👌
Gracias Mari por el feedback!